Unlike painting, furniture making is a reductive practice. The marks on every surface are only those of the last tool used. On show surfaces of pre-industrial furniture, you are typically looking at marks left by a try plane, smoothing plane, or scraper. There is no way we can peer into the past and know what the sawn boards looked like or how a fore-plane was used to remove saw kerfs, beginning the process of removing cups, and twists and truing the board.
When secondary surfaces of furniture are examined, however, we can often see the marks left by tools used early in the making process.
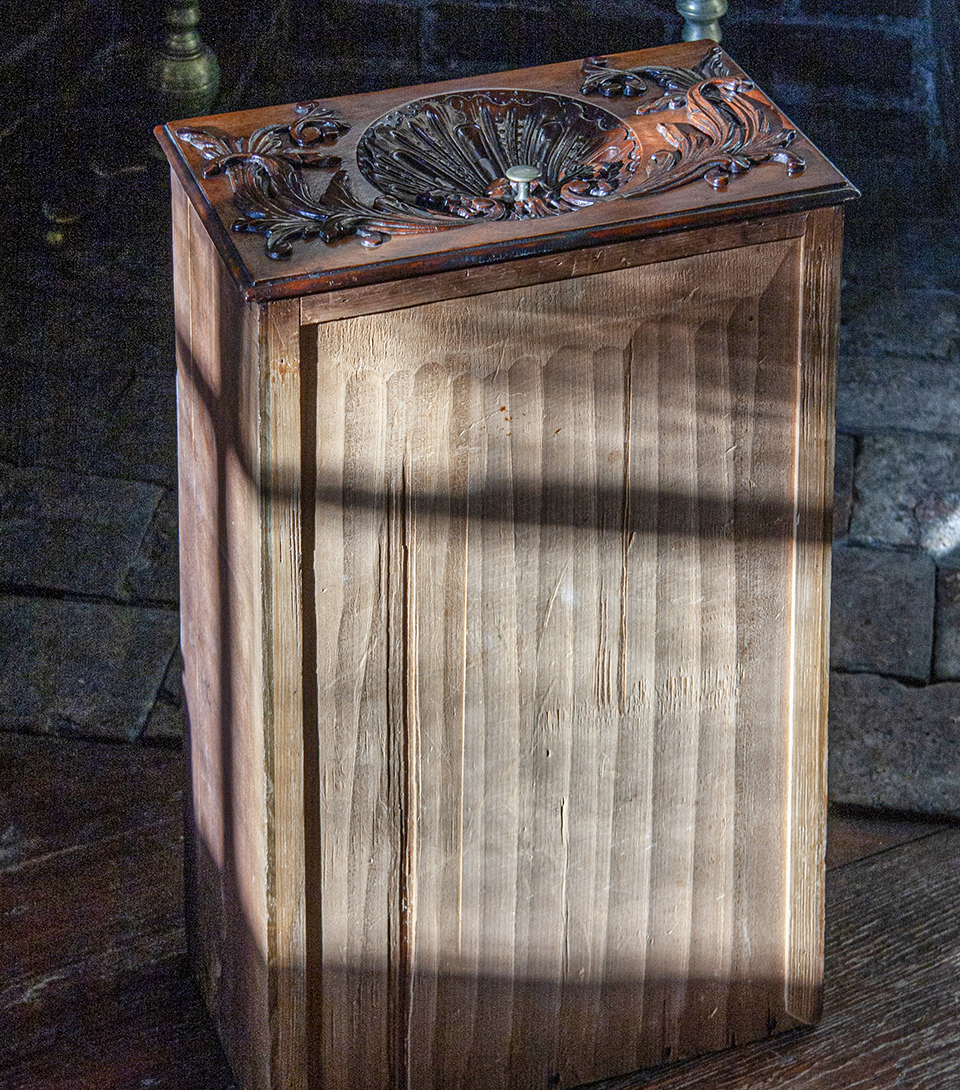
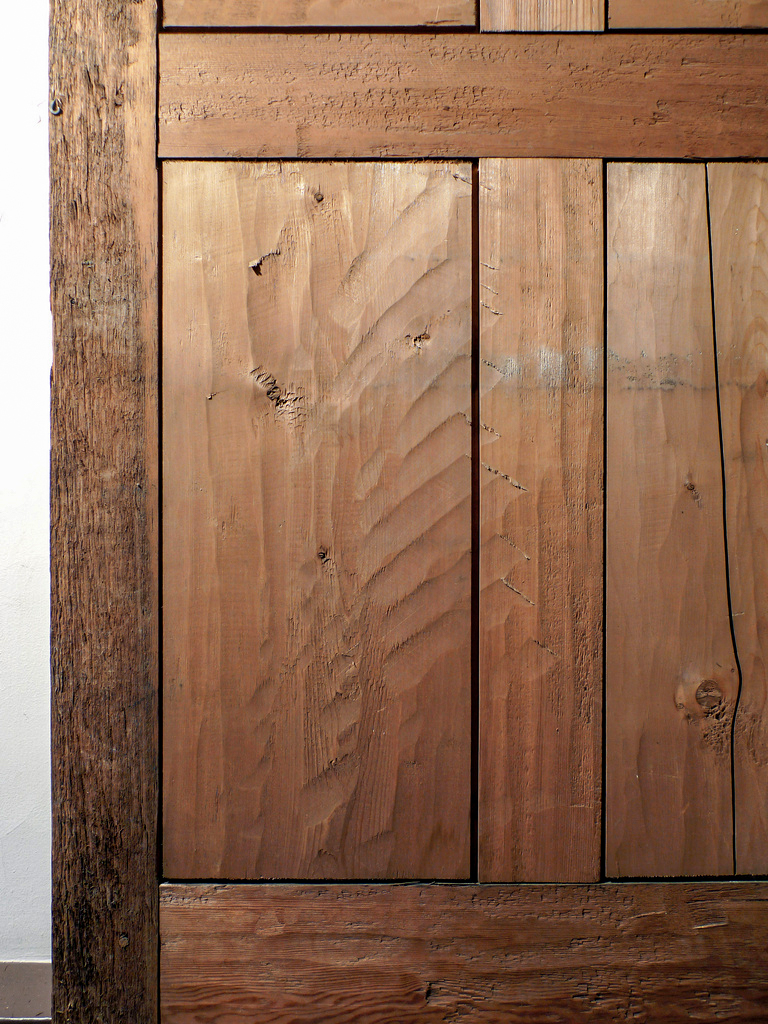
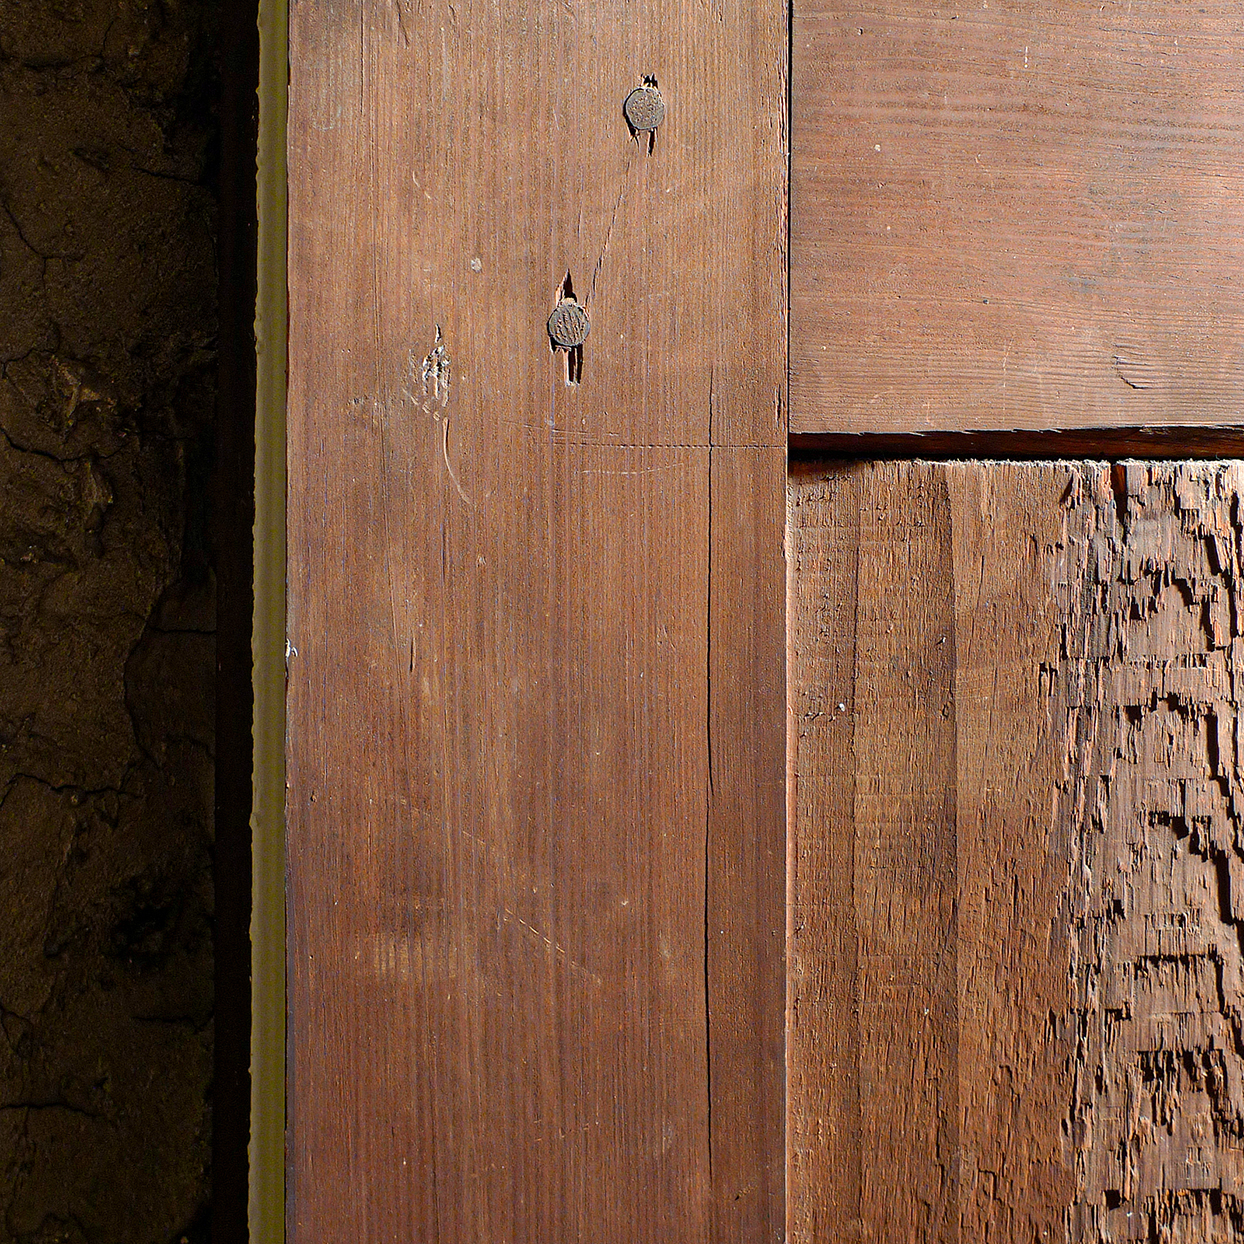
A shell-carved drawer from a c. 1760 dressing table made in Philadelphia. Raking light shows the tracks left by a fore-plane with a cambered iron pushed along the grain of a riven Atlantic white cedar bottom board. The plane easily removed the rough split surface left from riving. Using the versatile fore-plane, a joiner brought the board to the desired thickness while at the same time giving it a reasonably flat surface on account of the planes flat bed/bottom. The front edge of the bottom of the drawer was tapered with a smoothing plane running across the grain, fitting it to a groove in the drawer front. This type of finish on secondary surfaces – areas that would not usually be seen- was acceptable to clients at the time.This a a drawer made in late seventeenth century New England. Here you are looking at saw-kerf marks left after resawing a thicker board, probably in the shop where it was made, to produce a thin, light weight drawer bottom. The upper surface of the drawer bottom would have looked like this before a fore-plane removed the saw marks and a smoothing plane removed the hollows – called dawks by Moxon – and peaks left from the fore-plane.This is the underside of a dust-board in an early eighteenth century chest of drawers made in Philadelphia. The identical process used on the drawer bottom in the first image was used here. The upper surface the drawer runs on is planed smooth just as he upper surface of the drawer bottom. The iron of the fore-plane used on this board was shaped to a more gentle curve than the irons of the planes used on the boards seen in the earlier images. We can also see that the iron’s cutting edge had multiple nicks that produced raised lines of wood in the hollows/dawks. Since fore-planes were typically not used to produce a finished surface, time was saved by not having to remove the iron from the plane and taking it to the grindstone and/or sharpening stones to remove the nicks.The fixed door in the drawing room at Mount Pleasant, built 1763-1765 in what is now East Fairmount Park in Philadelphia, was removed for examination. It was made with hard pine stiles and rails and a combination of white pine and Atlantic white cedar panels.The hard pine vertical stile on the left has saw-kerfs left from a water mill. The hard pine lower rail was brought to the desired thickness with a fore-plane as were the other elements of the door. After the door was assembled, the pine panel on the left had to be further reduced in thickness. A fore-plane was pushed diagonally across the grain and was stopped as it hit the center stile of the door. No further work with planes was necessary as this side of the door would not be seen after it had been installed.A fore-plane was used to taper the sides of a panel of another fixed door at Mount Pleasant to fit grooves in the stiles, leaving the kerfs from mill-sawing over most of the panel. Chatter marks are present in the dawks left from the fore-plane with its iron set rank, pushed quickly through the soft white pine.
I have plenty! To really capture the tools marks you have to control the lighting. Snapshots don’t often do a good job of recording undulating surfaces.
Chris:
This is really good. The pictures are great fun to pore over. Looking at the tool marks, I’d say that these guys were working at speed. Whether making furniture or housejoinery, these guys were either on fixed price or on piecework. Looking at your pictures, I’d say that the items you show were all done on piecework. It’s especially notable on the back of the door where he had to replane the panel and was hitting the stile.
Another observation is that most/all of the joints on the back of the false door are open. With drawbored tenons, I’d guess that this was deliberate. Over cut the back of the joint so the front will fit dead tight. Saves time. Anyone who has made doors by hand can attest to the extra work involved in making both (front and back) tenon shoulders exactly coplanar and parallel with eachother
As a carpenter and furnituremaker who often works with hand tools, I’ve often had the experience, to which you can surely relate, that even without instruction or guidance, a hand tool woodworker will discover how the old timers did it just by trying it themselves. Soon enough it becomes obvious that there is often only one or two ways to do something efficiently.
The last item to mention is the strange way in which the false door casing does not drop directly onto the plinth, but instead jinks over to it. Wierd. I’ve never seen that before, anywhere.
Thanks John. Yes, they were working quickly and efficiently. Based on the shapes of the dawks the rankness of the iron set combined with the distance between the chatter marks, more than 1/8 of an inch in the case of the last image, you can set up a plane, get a similar piece of wood and and replicate the speed and force of the plane.
Sure, when one the side of the door won’t be seen, the joints can be open in the back so they are guaranteed to be closed on the other side. But the joiners had no problem getting the shoulders coplanar as all the functioning doors in the house prove. They are draw-bored with no glue.
One of the most important thing that I can bring to the study of furniture history is the ability to make/copy something to understand why something was done the way it was. The corollary to this is, I, or anyone who has worked a long time the way I have using pre-industrial tools and techniques, can look and these boards, know and feel physically the movement, speed, and muscular sensations need to do the work.
Good catch on the bottom of the casing miters. This happens throughout the house, not just on doors with the addition of carved trusses outside the casing. A good architectural post for the future.
It’s interesting to see how makers of the time used their skills to meet the demands of assembly, but also saved time & money by doing what was necessary, but nothing more.
Thank you, Chris.
Thanks.
Consumers and makers of these objects led different lives than the relatively cushy lives we have today. This ultimately is reflected in the objects made at different times in history.


Thanks, Chris. Love seeing these kind of things.
I have plenty! To really capture the tools marks you have to control the lighting. Snapshots don’t often do a good job of recording undulating surfaces.
Chris:
This is really good. The pictures are great fun to pore over. Looking at the tool marks, I’d say that these guys were working at speed. Whether making furniture or housejoinery, these guys were either on fixed price or on piecework. Looking at your pictures, I’d say that the items you show were all done on piecework. It’s especially notable on the back of the door where he had to replane the panel and was hitting the stile.
Another observation is that most/all of the joints on the back of the false door are open. With drawbored tenons, I’d guess that this was deliberate. Over cut the back of the joint so the front will fit dead tight. Saves time. Anyone who has made doors by hand can attest to the extra work involved in making both (front and back) tenon shoulders exactly coplanar and parallel with eachother
As a carpenter and furnituremaker who often works with hand tools, I’ve often had the experience, to which you can surely relate, that even without instruction or guidance, a hand tool woodworker will discover how the old timers did it just by trying it themselves. Soon enough it becomes obvious that there is often only one or two ways to do something efficiently.
The last item to mention is the strange way in which the false door casing does not drop directly onto the plinth, but instead jinks over to it. Wierd. I’ve never seen that before, anywhere.
Thanks for your informative and interesting post.
Regards,
John
Thanks John. Yes, they were working quickly and efficiently. Based on the shapes of the dawks the rankness of the iron set combined with the distance between the chatter marks, more than 1/8 of an inch in the case of the last image, you can set up a plane, get a similar piece of wood and and replicate the speed and force of the plane.
Sure, when one the side of the door won’t be seen, the joints can be open in the back so they are guaranteed to be closed on the other side. But the joiners had no problem getting the shoulders coplanar as all the functioning doors in the house prove. They are draw-bored with no glue.
One of the most important thing that I can bring to the study of furniture history is the ability to make/copy something to understand why something was done the way it was. The corollary to this is, I, or anyone who has worked a long time the way I have using pre-industrial tools and techniques, can look and these boards, know and feel physically the movement, speed, and muscular sensations need to do the work.
Good catch on the bottom of the casing miters. This happens throughout the house, not just on doors with the addition of carved trusses outside the casing. A good architectural post for the future.
Pingback: Out of Sight | Pegs and 'Tails
It’s interesting to see how makers of the time used their skills to meet the demands of assembly, but also saved time & money by doing what was necessary, but nothing more.
Thank you, Chris.
Thanks.
Consumers and makers of these objects led different lives than the relatively cushy lives we have today. This ultimately is reflected in the objects made at different times in history.